-

-
Restorer Ultimate Documentation
- Contents
- Index
- Introduction to Restorer Ultimate
- Restorer Ultimate Main Panel, Settings, and Log
- Images and Regions
-
File Recovery
- Recover Files from Existing Logical Disks
- Recover Files from Deleted/Corrupted Logical Disks and Partitions
- Disk Scan
-
Data Recovery from Volume Sets and RAIDs
- Spanned Volumes, Stripe Sets, and Mirrors
- Basic RAID 4 and RAID 5
- RAID 6 Reed-Solomon Presets
- RAID6 (Double Xor) Presets
- RAIDs with Parity Delays
- Advanced RAID Layouts
- Nested and Non-Standard RAID Levels
- Finding RAID Parameters
- Checking RAID Consistency
- Syntax of a Description File for RAID Configurations
- Description Files for RAID Configurations
- Various Disk and Volume Managers
- Data Recovery over Network
- Text/hexadecimal Editor
- Technical Information
© 2020 BitMart Inc.
All rights reserved.
Recover Files from Existing Logical Disks
Note : If you have done all these operations listed below, but still cannot find your lost files, you need to perform an disk scan for the files on the logical disk.
To recover deleted files from a logical disk,
| 1 | Select the logical disk where the deleted files resided on the Device/Disk list and click the Next button |

Device/Disk list panel
If there is bad S.M.A.R.T. data for the hard drive, Restorer Ultimate will show a S.M.A.R.T. warning describing the situation. You may decide what to do with the drive.
| 2 | Select File search on the File search/Disk scan panel and click the Next button |

File search/Disk scan panel
 Other ways to start file search
|
• Right-click the selected disk and select Open Drive Files on the shortcut menu , or • Double-click the disk or • Select the disk and press the F5 key |
Click the panel regions to learn their functions.
|
To reach the View menu, click the Restorer Ultimate top left corner, and select Advanced on the menu. You may set which panels and bars to enable/disable. To enable/disable |
|
|
The Folders panel |
Select/clear Folders View on the View menu |
|
The Content panel |
Select/clear Contents View on the View menu |
|
The Find Results panel |
Select/clear Find Results View on the View menu |
|
You may select how the data the will be graphically represented in the Content panel. To view the data as: |
|
|
Large icons |
Select Large Icons on the View menu |
|
Medium icons |
Select Medium Icons on the View menu |
|
Small icons |
Select Small Icons on the View menu |
|
Details |
Select Details on the View menu |
|
You may also arrange files on the the Folders panel as required. Select Arrange on the View menu or on the Folders panel shortcut menu and then a required arrangement. You may also select which columns to see on the the Folders panel. Select Contents Columns on the View menu or on the Folders panel shortcut menu and them a required arrangement. |
|
|
You may also select to show/disable various warnings and confirmation. Select on the Help menu Show All Hints: to show all warning messages for which the Never show again check box has been selected. Disable All Hints: to never show any warning messages in which the Never show again check box exists. To reach the Help menu, click the Restorer Ultimate top left corner |
|
|
Files can be shown as a list or as icons/tiles of different sizes. 
Files shown as icons/tiles |
|
|
Recovery chances Restorer Ultimate shows its estimates of chances for successful file recovery in the Rec column. |
|
|
File Information You may view some information about a file. Right-click the file and select Get Info on the context menu. 
File Information
|
|
You can change the way Restorer Ultimate sorts the files. You may sort files by their extensions , creation/modification/accessed time, or view the real folder/file structure .
You may also copy the information about folders and files.
|
Click Copy Folder : |
To copy the folder's name |
|
Click Copy Path : |
To copy the path to the folder |
|
Click Copy (Column Name) : |
To copy the file's Name , Size , Created , etc., depending on which column is selected |
|
Click Copy Path : |
To copy the file path. |
|
Click Copy Selected Text : |
To copy all the columns of the selected file. |
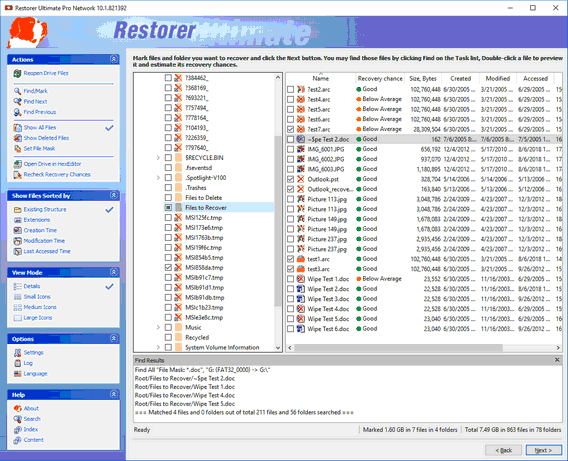
| 3 | Select folders and files to recover and click the Next button |
Mark a file/folder to recover by clicking the box left to the object, or select Mark on the shortcut menu. You may mark several files/folders in different parent folders. You may mark all objects in the folder by selecting Mark All on the Tools or shortcut menu. To unmark an object, click the box left to the object once more or select Unmark on the shortcut menu. You may unmark all objects in the folder by selecting Unmark All on the Tools or shortcut menu.
To reach the Tools menu, click the Restorer Ultimate top left corner and select Advanced .
Restorer Ultimate can find and mark files. Go to the Find and Mark Files topic for details.
File content may be previewed before recovery. Go to the Previewing Files topic for details.
If you do not find files that you want to recover:
Sometimes Restorer Ultimate can find the files but not the entire file paths to them. It puts such files into the Extra Found Files folder. Try to search for the files there. If that does not help, try to find them by using file search globally on the entire disk. Go to the Find and Mark Files topic for details
If you still cannot find files that you want to recover but are sure they have existed on the logical disk, you need to use Disk Scan to find them.
| 4 | Specify recovery options, select the target folder for recovered files on the Recover panel and click the Next button. |
NEVER TRY TO SAVE RECOVERED FILES/FOLDERS ON THE SAME LOGICAL DISK WHERE THEY RESIDE!!!
Or you may obtain unpredictable results and lose all your data.

Recovery options panel panel
If you have another computer connected to Restorer Ultimate over network, the Recover dialog box will be slightly different. See File Recovery on a Remote Computer for details.
Recover options
|
Recover the entire path to the file object: |
If this check box is selected, Restore Ultimate recovers the entire path to the selected object. |
|
Restore path from the root folder |
If this check box is selected, Restore Ultimate recovers the entire path to the selected object starting from the root folder of the disk. |
|
Recover real folders structure |
Enabled when the files are sorted by their extensions or date. If this check box is selected, Restore Ultimate recovers the real folders/files structure on the disk rather than that of sorted files. |
|
Recover all content of a selected folder, ignoring specified file mask: |
If this check box is selected, Restore Ultimate recovers all content of selected folder(s), ignoring specified File Mask . |
|
Recover alternative data streams: |
If this check box is selected, Restore Ultimate recovers alternative data streams for NTFS files. Has no effect on FAT files. See Extended Information Recovery for details. |
|
Recover security attributes: |
If this check box is selected, Restore Ultimate recovers security attributes for NTFS files. Has no effect on FAT files. See Extended Information Recovery for details. |
|
Recover extended attributes: |
If this check box is selected, Restore Ultimate recovers extended (HPFS) file attributes. |
|
Do not recover hidden and system attributes |
If this check box is selected, Restore Ultimate will remove the Hidden and System attributes from recovered files enabling the user to see them in the Windows Explorer. |
|
Recover disk metafiles |
If this check box is selected, Restore Ultimate recovers disk metafiles. Metafiles are the file system's internal files invisible to any user, or file system data, which Restore Ultimate represents as files. These files do not contain user data directly. Unless you want to scrutinize a disk file system, do not restore them. |
|
Bad Sectors Options |
You may specify how to process files with bad sectors. You may specify the number of attempts to read the bad sectors and a patter to fill the bad block. |

Bad Sectors Options dialog box
| > | Restorer Ultimate will recover the selected and marked files to the specified folder. |
The Recovery results panel will show the results.
If there is/are file(s) with the same name in the output folder, the File already exists dialog box will appear. You may overwrite, rename, or skip the file, or abort recovering.

File already exists dialog box
If a file to be recovered appears to have an invalid name, a Broken File Name dialog box will appear. You may correct the name and resume file recovery.

Broken File Name dialog box
Broken File Name options
|
File name |
Shows the current incorrect file name. |
|
New name |
Field for a new file name. |
|
Edit broken symbols only |
If this check box is selected, only invalid symbols may be corrected |
|
Change all invalid symbols to |
If this check box is selected, all invalid symbols will be changed to the specified symbol |
|
Buttons |
|
|
Rename |
Click to resume file recovery |
|
Rename All |
Click to resume file recovery. All other files will be renamed according to the specified rule. |
|
Skip |
Click to skip this file |
|
Skip All |
Click to skip all files and stop file recovery |

Recovery results panel