-

-
Restorer Ultimate Documentation
- Contents
- Index
- Introduction to Restorer Ultimate
- Restorer Ultimate Main Panel, Settings, and Log
- Images and Regions
-
File Recovery
- Recover Files from Existing Logical Disks
- Recover Files from Deleted/Corrupted Logical Disks and Partitions
- Disk Scan
-
Data Recovery from Volume Sets and RAIDs
- Spanned Volumes, Stripe Sets, and Mirrors
- Basic RAID 4 and RAID 5
- RAID 6 Reed-Solomon Presets
- RAID6 (Double Xor) Presets
- RAIDs with Parity Delays
- Advanced RAID Layouts
- Nested and Non-Standard RAID Levels
- Finding RAID Parameters
- Checking RAID Consistency
- Syntax of a Description File for RAID Configurations
- Description Files for RAID Configurations
- Various Disk and Volume Managers
- Data Recovery over Network
- Text/hexadecimal Editor
- Technical Information
© 2020 BitMart Inc.
All rights reserved.
Text/hexadecimal Editor
(Available on Restorer Ultimate PRO and Restorer Ultimate PRO Network only)
YOU MUST BE ABSOLUTELY SURE OF WHAT AND WHERE YOU ARE WRITING!
Or you may completely lose all your data.
Any object visible by Restorer Ultimate can be viewed and edited in the Text/Hexadecimal Editor .
Before you can physically write anything on a disk, you need to enable writing.
To enable writing,
| 1 | Select Enable Write on the Settings dialog box |
| 2 | Select Enable Write on the Tools menu of the Text/Hexadecimal Editor's main panel |
Locking and unlocking objects
It is possible to manually lock an object being edited in Text/hexadecimal Editor .
When an object is locked, Text/hexadecimal Editor has an exclusive access to it, and no other programs or Windows can make any changes on it. Text/hexadecimal Editor itself always locks the object itself before writing anything on the disk and then unlocks it. But sometimes locking/unlocking may take quite a lot of time, up to several seconds. That is why sometimes it is a good practice to lock an object while editing it in Text/hexadecimal Editor . This can be done by selecting Lock on the Tools menu.
When considering locking an object in Text/hexadecimal Editor , keep in mind the following:
• Starting from Windows 7, it is impossible to change data if it resides on a logical disk without locking the disk. If the data is on a place outside of any logical disk (on an unmounted partition or empty space), such lock is not necessary. Windows Vista, XP, or below do not have such restrictions.
• The Lock command tries to lock all logical disks on which the object being edited is placed. For a hard drive, those are all its logical disks, for a file that is a logical disk where it resides. And if a RAID is created from logical disks and a file is opened on that RAID, Text/hexadecimal Editor blocks all logical disks on which the file resides.
Moreover:
• If a logical disk is opened in Text/hexadecimal Editor , the Lock command locks the disk if there is no files opened by some other programs.
• If a hard drive is opened in Text/hexadecimal Editor , the Lock command locks the drive if all its logical disks can be locked. That may cause problems is one of the logical disks is a system one.
To view/edit an object,
| 1 | Right-click the object and select View/Edit on the shortcut menu |
| > | A Viewer/Editor panel will appear |
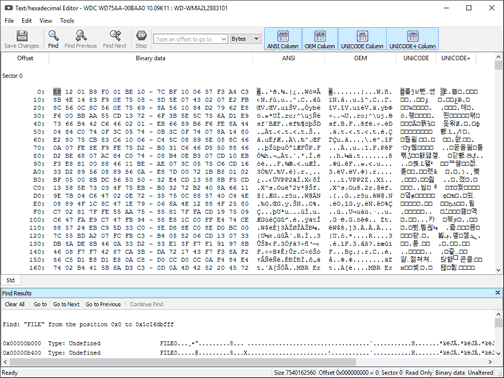
 Restorer Ultimate Text/Hexadecimal editor
|
Click the panel regions to learn their functions. |
Panel view options
You may set which panels and bars to enable/disable.
To enable/disable:
|
Sector number |
Select/clear Sectors on the View menu |
|
Binary data |
Select/clear BYTES on the View menu |
|
ANSI data |
Select/clear ANSI on the View menu or click the ANSI button |
|
OEM data |
Select/clear OEMr on the View menu or click the OEM button |
|
UNICODE data |
Select/clear UNICODE on the View menu or click the UNICODE button |
|
UNICODE+ data |
Select/clear UNICODE+ on the View menu or click the UNICODE+ button |
|
Toolbar |
Select/clear Toolbar on the View menu |
|
Status bar |
Select/clear Status bar on the View menu |
|
Find Results View |
Select/clear Find Results View on the View menu |
| 2 | View the information and make necessary changes |
Click the Save Changes button if you want to save changes.
Other ways to save changes
|
• Select Save Changes on the Tools menu if you want to save changes. or • Press the Ctrl+S keys |
Viewing
There are up to four tabs showing the data in different representations. Actual number of tabs depends on the object and property being viewed/edited.
|
Std |
Exact attribute data. If the attribute is compressed, Restorer Ultimate decompresses it prior to showing. |
|
Unlimited |
Exact attribute data + free space of last cluster. If the attribute is compressed, Restorer Ultimate decompresses it prior to showing. |
|
Direct |
Actual data written on the disk. If the attribute is not compressed, it coincides with the Std representation. |
|
Allocation |
Resident part of the attribute. |
You may view data in 4 various code pages: ANSI/OEM/UNICODE/UNICODE+ by switching on/off the respective code pages in the Code pages buttons or select the appropriate code pages on the View menu.
You may see which file is written on a particular sector. See Files and Sectors for details.
Navigating
Text/hexadecimal Editor gives you various ways to navigate into an object. See the Navigating through an Object for more details.
Filling an area with a pattern
To fill an area with a pattern, select Fill on the Edit menu, and specify the pattern and area on the Fill dialog box.

Fill dialog box
Fill options
|
Fill pattern |
|
|
HEX |
Field for the pattern to fill the area in the hexadecimal representation |
|
ANSI |
Field for the pattern to fill the area in the ANSI encoding |
|
OEM |
Field for the pattern to fill the area in the OEM encoding |
|
UNICODE |
Field for the pattern to fill the area in the UNICODE encoding |
|
Fill range |
|
|
From (hex) |
Field for the start position of the area to fill with the pattern |
|
To (hex) |
Field for the end position of the area to fill with the pattern |
| 3 | Click the Save Changes button to save the changes |
| > | Viewer/Editor will save the changes on the object |
YOU MUST BE ABSOLUTELY SURE OF WHAT AND WHERE YOU ARE WRITING!
Or you may completely lose all your data.
Selecting and saving an area in the Viewer/Editor
You may select an area in the Viewer/Editor panel and save it as a file.
To select and save an area in the Viewer/Editor panel ,
| 1 | Right-click the beginning of the selection and select Select From on the shortcut menu |
| 2 | Right-click the end of the selection and select Select To on the shortcut menu |
Other ways to select an area
|
• Select Select... on the Tools menu and specify an area to select on the Select dialog box, or • Click the start point of the area and drag the mouse cursor to its end. |
If you need to select an entire object, select Select All on the Tools menu or click the Ctrl+A key

Select dialog box
| 3 | Select an appropriate item in the Tools menu to save the data in a required format and specify its file name |
Select:
|
Save to Binary File... |
to save the data in the binary format (default extension is .bin ) |
|
Save to Hexadecimal File |
to save the data in the binary format (default extension is .hex ) |
on the Tools menu.
If a remote computer is connected for Data Recovery over Network , the Save as... dialog box will appear when you select a place to save the data. You may save it to the local or remote computer.
| > | Viewer/Editor will save the data in the file |
Loading data from an external file
You may load a data from a file and overwrite an area of the object opened in the Viewer/Editor panel.
To load binary data from a file and overwrite an area of the object opened in the Viewer/Editor panel ,
| 1 | Select an area to overwrite and select Load from File... on the Tools menu |
If a remote computer is connected for Data Recovery over Network , the Open as Binary File dialog box will appear when you select a place to open the data file from. You may open it from the local or remote computer.
| 2 | Select the necessary file and load the data. |
| > | The area in the Viewer/Editor will be overwritten with the new data. |